Contact Us

Use the form on the right to contact us.

You can edit the text in this area, and change where the contact form on the right submits to, by entering edit mode using the modes on the bottom right. 

2915 19 St NE
Calgary, AB, T2E 7A2

18662506101

WonderFil Specialty Thread Blog

WonderFil brings you the latest news, events, upcoming thread lines and special tips and advice. Follow WonderFil Specialty Threads on our social media: Facebook, Instagram, Twitter, Pinterest, and Youtube.

DIY Places I’ve Been Pin Cushion

Maura Kang

This palm-sized pin holder is perfect for showing all the places you’ve visited around the world (or perhaps all the places you’d like to visit someday)! We’ve simplified the 7 continents and provided a handy layout map to arrange them with. Simply cut and sew your sphere, stuff it, and appliqué the pieces on top. All the techniques involved are easy enough for beginner sewers!

To start off you can print out our free pattern by clicking here.

Screen Shot 2020-04-03 at 10.47.45 AM.png

Next you can gather materials. Here is a list of materials that we suggest for this project:
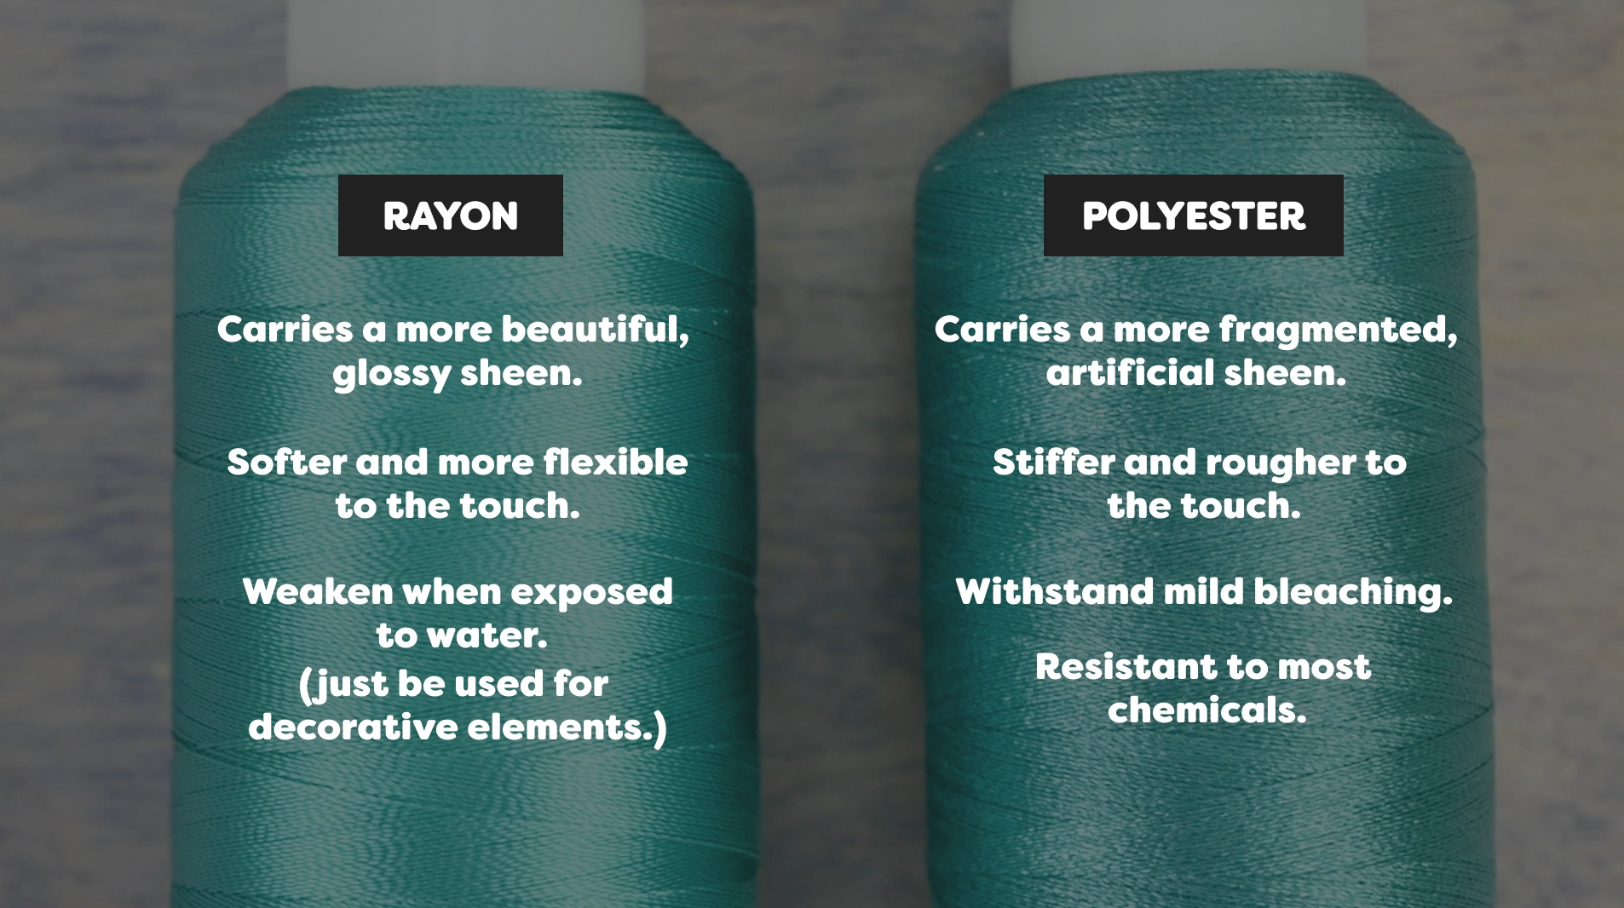
Fabric:

Thread:

Other:

  • Polyester fibre fill (you can also use rice or beans as an alternative)

You can find the material and thread on our site: https://shopwonderfil.com/

Once you cut out the pattern pieces for the design then we are going to start off with the sphere part of the globe. You will cut the sphere template out of the wool mentioned above (color we suggest is 53)

Screen Shot 2020-04-03 at 10.49.41 AM.png

After cutting this out it should look as pictured below:

Screen Shot 2020-04-03 at 11.07.08 AM.png
Screen Shot 2020-04-03 at 11.09.11 AM.png

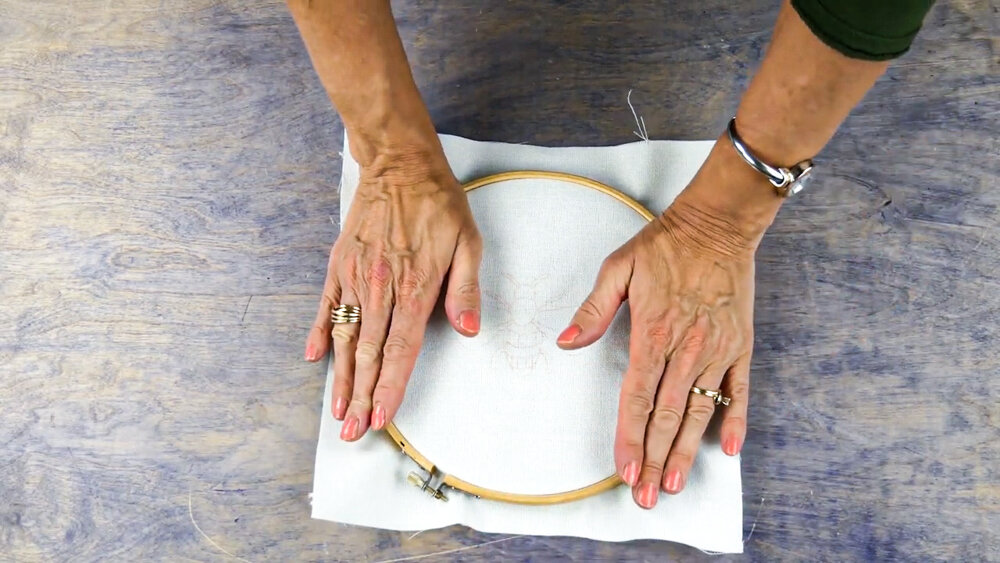
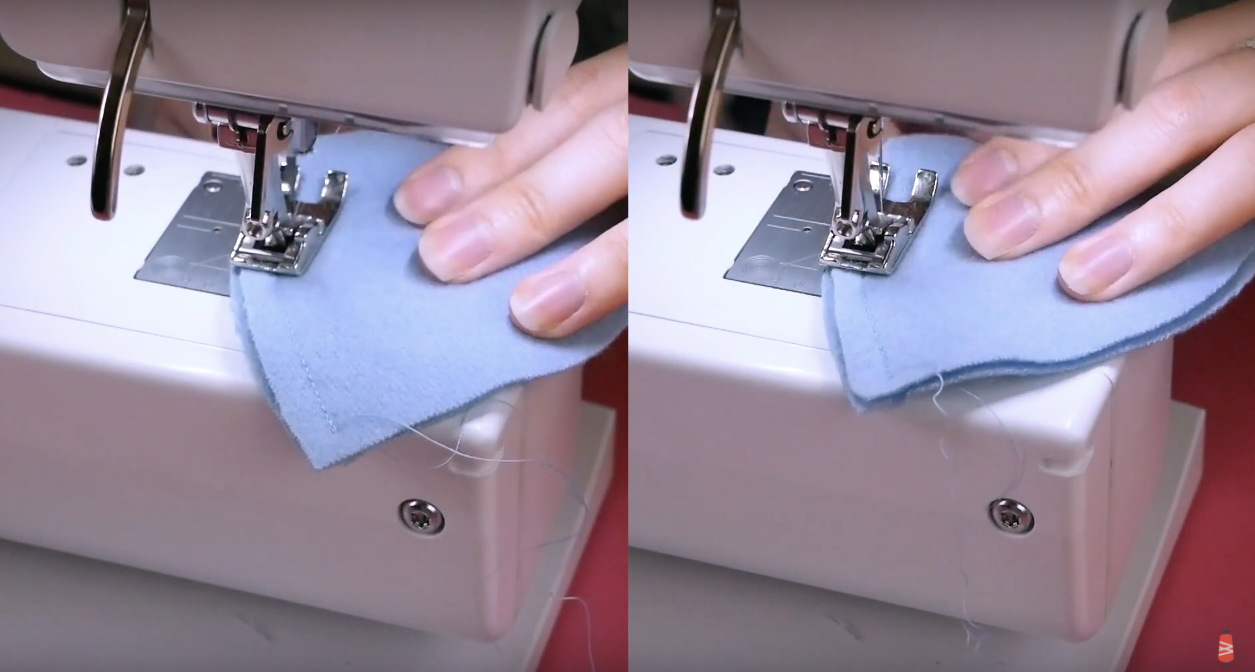
To assemble: stack two pieces together and sew along one side. We suggest pinning to hold in place, though if you have more experience you can probably manage with no pins.

We are going to sew these pieces together on a machine. We suggest using the thread called Konfetti as a top thread and a DecoBob Prewound bobbin. The colors we are using are 609 for Konfetti and 319 for the bobbin; these will match well with the wool, and create a nice smooth seam.

Screen Shot 2020-04-03 at 10.50.06 AM.png

You can sew with a 1/4″ seam allowance along each edge, combining the long sides of the sphere together.

Screen Shot 2020-04-03 at 11.13.53 AM.png

Place the pieces together until you begin creating the sphere shape.

Screen Shot 2020-04-03 at 11.13.13 AM.png

When attaching the final 5th piece to your sphere you want to make sure to leave enough of a gap so your can turn it through.

Screen Shot 2020-04-03 at 11.17.20 AM.png
Screen Shot 2020-04-03 at 11.19.04 AM.png

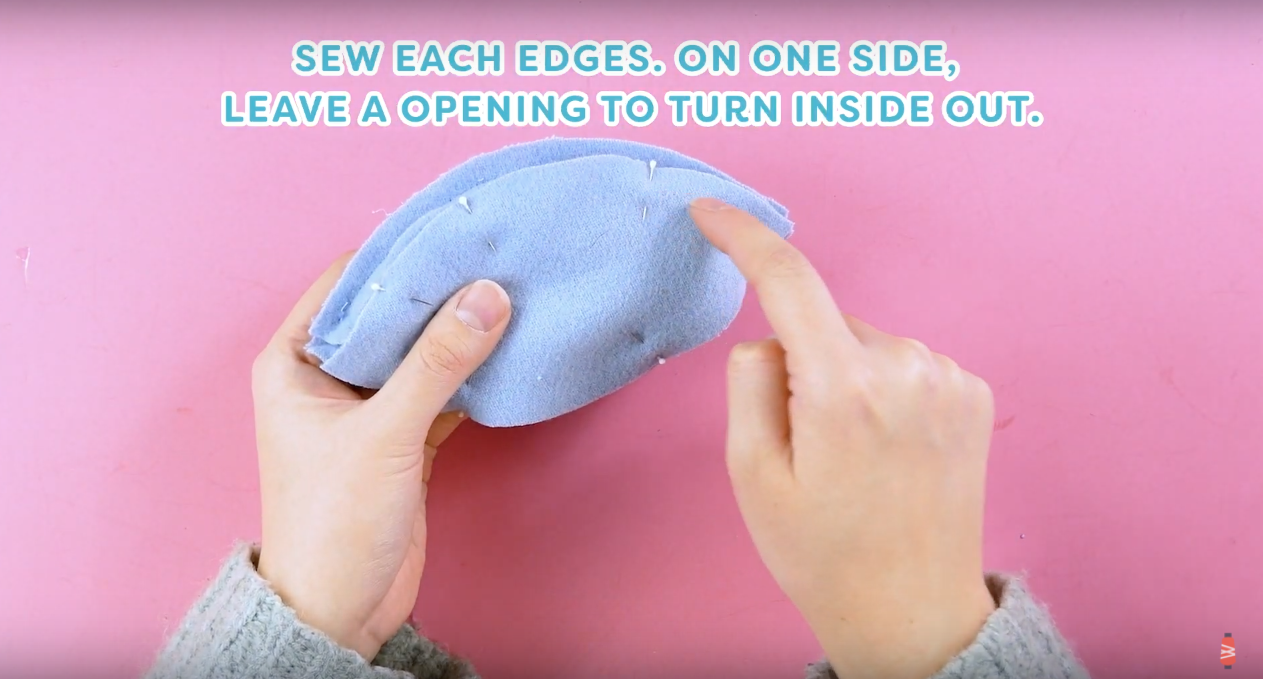
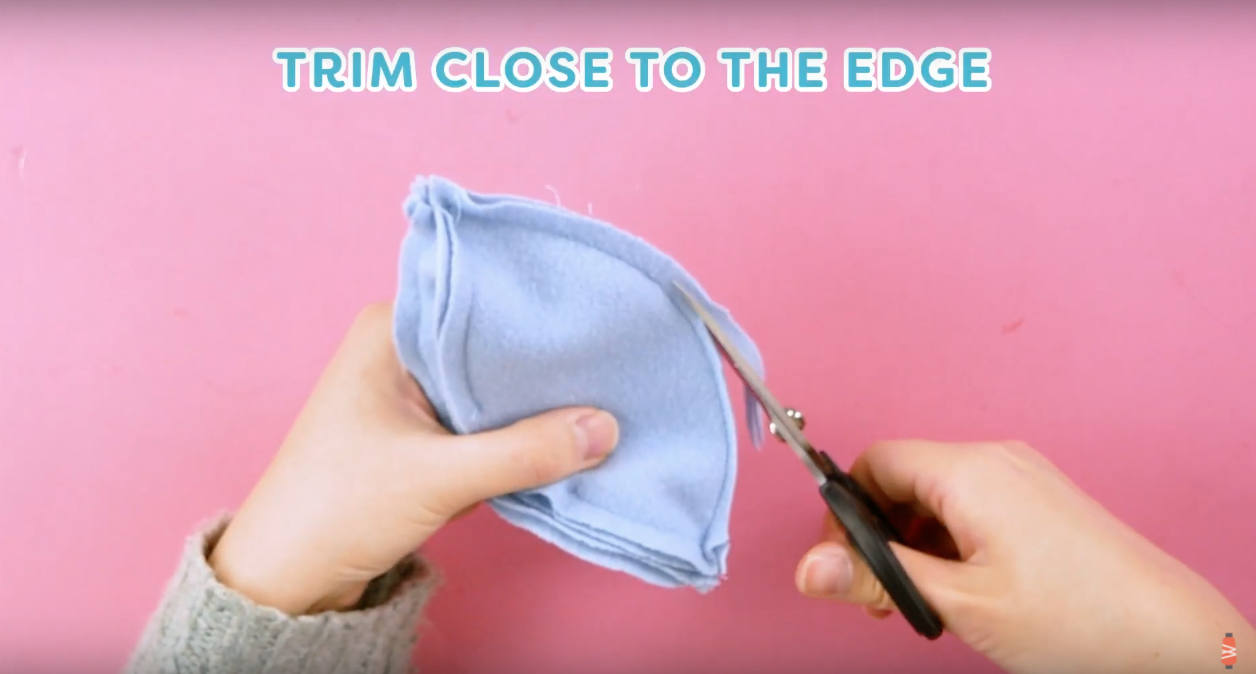
Once you have completed all of the seams then trim the seam allowance. This will make the seams less bulky when you pull it through to the right side. Be careful not to catch any stitches.

After trimming you can turn your sphere inside out through the opening you left.

Screen Shot 2020-04-03 at 11.21.45 AM.png

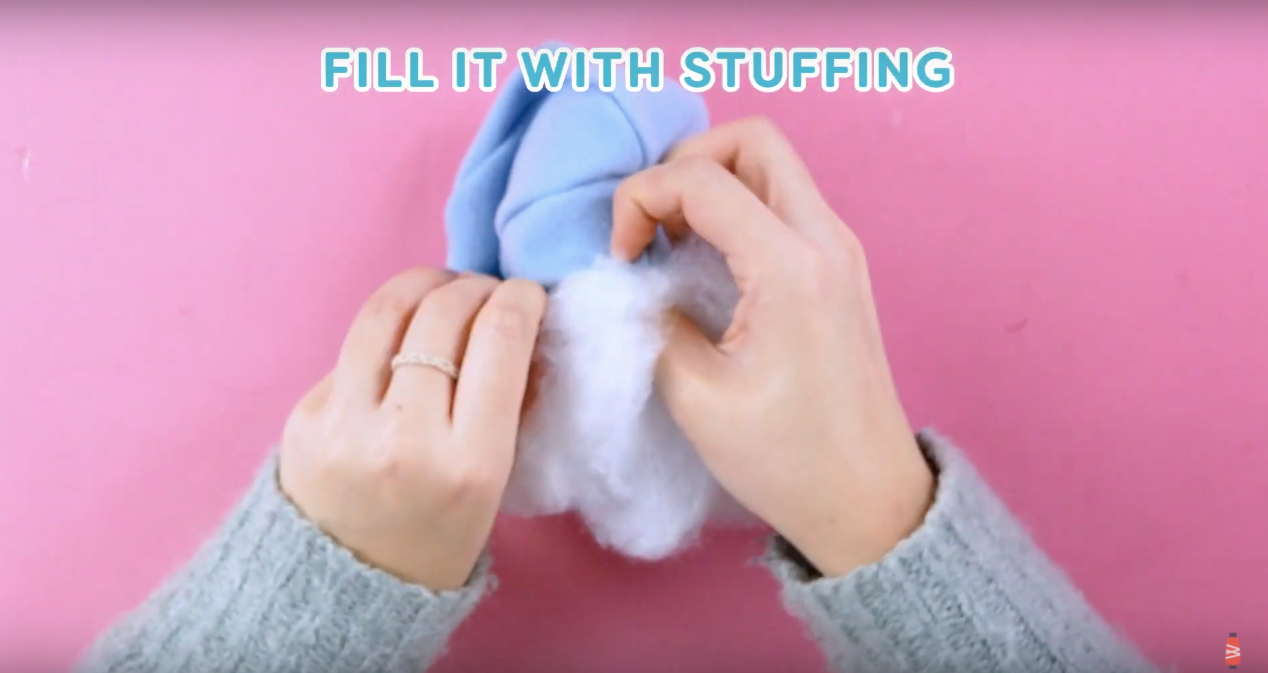
You can now fill with stuffing!

Screen Shot 2020-04-03 at 11.24.28 AM.png
Screen Shot 2020-04-03 at 11.25.00 AM.png

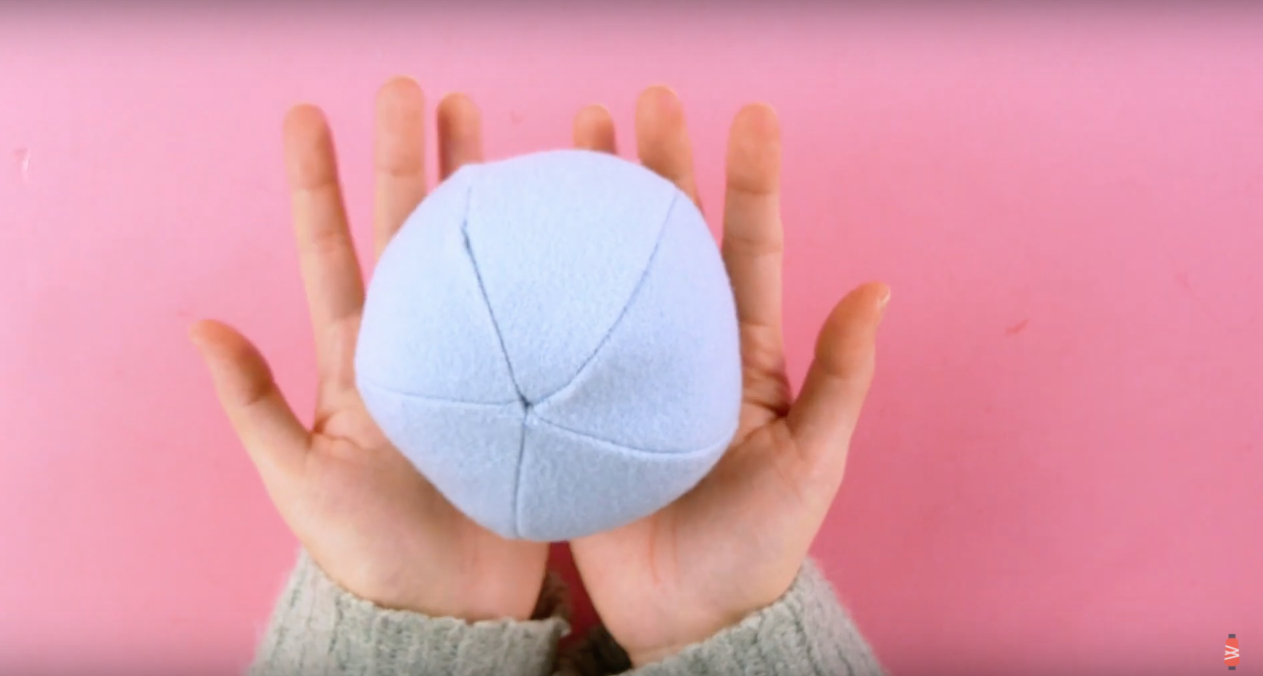
Next you are going to close the opening we made. We used DecoBob since it is so thin, it hides the stitching well. Hand-stitch your opening shut. The easiest way to do this is with a whipstitch.

Now we have a lovely sphere! You can now begin appliquéing your continents down.

Screen Shot 2020-04-03 at 11.27.12 AM.png
Screen Shot 2020-04-03 at 10.52.28 AM.png

We used colors from our Merino wool packs in Green and Grey to cut out our continents.

Once you cut out your shapes then you can begin assembling.

Screen Shot 2020-04-03 at 11.29.58 AM.png
Screen Shot 2020-04-03 at 11.30.40 AM.png

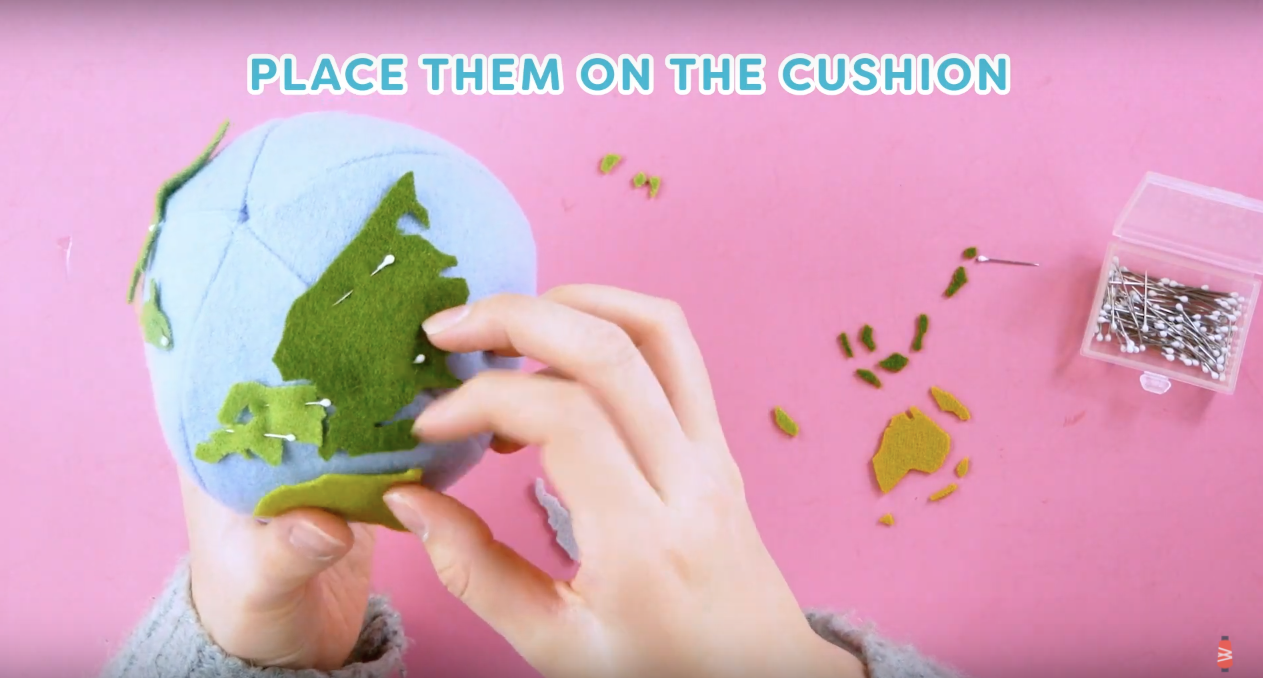
You can place them on the cushion using pins. We included the layout with the pattern, or you can reference a map of your choice.

We are going to hand sew these sections of wool onto the sphere. The thread we are using is called Efina. This is a great cotton thread, and will match the wool perfectly. The colors that we are using to match are: 01, 10, 11, 12, 13, 14, and 16.

Screen Shot 2020-04-03 at 10.52.48 AM.png

To finish it off just hand applique the sections. Once again you can use a whipstitch or anything that you want to secure the land to the sphere.

Screen Shot 2020-04-03 at 11.34.00 AM.png

Now you are all done! I hope that with this neat earth pincushion will keep you thinking about cool trips from the past and future. Though we are all grounded at home lately, stay positive and set goals or plans for the future to look forward to! We hope that you enjoyed making this project! If you decided to make this pincushion we would love to see. Tag us on Facebook @wonderfil, instagram @wonderfilspecialtythreads, or using the hashtag #wonderfil. Happy crafting!

WhatsApp Image 2020-04-03 at 3.21.17 PM.jpeg

Catnip Carrot Cat Toy

Maura Kang

1.jpg

Have a cat at home that needs some lovin'? Entertain them (and you!) with a homemade catnip-stuffed carrot toy. This simple pattern can be whipped up in under an hour but will provide several hours of fun for your fluffy feline. This simple and quick project can be done with just a few small pieces of wool or felt fabric and some basic hand stitches to make it look pretty.

Materials:

-       Download and print the free pattern here.

-       Loose catnip to stuff the toy with.

-       A sheet of orange wool or felt material, approx. 9” x 7” (we used color LN49 Kumquat from the 1/32 Merino wool size packs in Orange).

-       One or two colours of green wool or felt material, approx. 7” x 4.5” (we used colors LN14 Periodot and LN16 Pine Needle from the 1/64 Merino wool size packs in Green).

-       A top thread for sewing in the machine (we used 50wt Egyptian cotton Konfetti thread in color KT404).

-       A bobbin thread (we used 80wt DecoBob cottonized poly in color DB410).

-       #8 perle cotton embroidery thread (we used Eleganza perle cotton in colors EZ118 New Spring and EZM1060 Volcano)

(optional) A wool/acrylic thread to sew the top shut after stuffing (we used Ellana wool/acrylic in color EN49 Kumquat to pair with the orange wool precisely).

2.jpg

Begin by cutting out and tracing the free pattern (downloadable above) and cutting out your carrot pieces.

3.jpg

Use your #8 perle cotton to add some embellishments to your pieces. While you can embellish your them however you like, we used a simple chain stitch to add some accents to each wool piece.

4.jpg
5.jpg

Load your machine with a regular sewing thread in the top and bobbin. Lay your two orange carrot pieces right sides together and sew using a ¼” (quarter inch) seam allowance to sew the sides and tip together. Begin slightly below the corner on one side and end at the same place on the opposite so that you leave an opening at the top. Don’t forget to backstitch on both ends.

6.jpg

Trim and turn your piece inside out so the right sides are facing out again. Now you can stuff the pocket with catnip! Don’t overstuff the toy and ensure the top flap will lay flat so you can still sew it shut.

7.jpg

Arrange the two leaves in the top and tuck in the loose edges. Pin or clip it all together and hand sew the opening closed using the wool/acrylic thread. This thread will blend in significantly better into the wool fibres, especially if you use the Merino wool and Ellana wool/acrylic thread as they are dyed to the exact same color.

8.jpg

That’s actually all there is to it! This adorable little toy will keep your cat busy for hours. If you make it yourself, don’t forget to tag us on social media using #wonderfil to share it with us!

No Sew Wool Fabric Succulents

WonderFil Specialty Threads

If you are anything like me, keeping plants alive may be a bit of a challenge. Many people turn to fake plants to fill up their space and make it lively. We all know home décor can be pretty pricey, so we are going to show you an inexpensive and crafty way to spice up your space. We are going to be showing you how to make some pretty wool succulents that require no sewing as pictured below:

1.png

What you’ll need: Green wool, hot glue/gun, free downloadable pattern, and anything to add depth of color such as paint, crayons, lipstick, eye shadow, etc.

For the wool we recommend using for these succulents is 100% superior grade Australian merino wool, and we are using colors LN17, and LN16. If you want to do the same you can find more information to purchase here

1.02.png

Getting Started: You can download our free pattern right here: https://bit.ly/2UUIGgo and it is pictured below.

0.23.png

Cut out the pattern with paper scissors so you can pin or trace out onto your wool. We decided to pin the paper to the wool, and cut this way.

0.36.png
0.53.png

Once you have them all cut out we began with succulent number one. In order to add a bit of realism we added some lipstick to the outer edges for a pop of color.

1.25.png

Assembly: Take piece 1A and put a little circle of glue in the middle.

1.38.png

Place piece 1B on top of 1A and off set it so that they do not line up. This will give more dimension. We used a marker to push the pieces together, especially since the glue can burn you.

1.53.png

To add some more depth you want to glue the sliver of 1C in order to close the shape, so it will look more like a cone.

2.01.png

Glue 1C on top of your succulent, and repeat with 1D. Making 1D also into a cone by gluing to close the gap and then adding it on top of your succulent.  We pushed into the middle with a pen to make sure it is all secured.

2.25.png

Take piece 1F and roll it up- creating a cylinder shape.

2.27.png

Then place glue and then 1F onto the top of your succulent. And it should look something like the picture below.

2.41.png

Succulent 2: To prep and add more dimension again we added lipstick to the outer edges, and eye shadow around the pieces.

2.58.png

Assembly: Take piece 2A and add a circle of glue in the middle. And then take piece 2B and adhere it to the bottom. Making sure it is again off set

3.20.png

Cutting a little x into the middle of pieces 2C, 2D, and 2E will add depth.

3.29.png

On your succulent add another circle of glue in the middle and add piece 2C. Push in the middle of the x , you cut to combine the pieces and also add a little space for the next piece to sink down into (adding depth)

3.43.png

Then continue adding pieces 2D and 2E the same way, pushing the middle in with a pen. Then same with succulent 1 you want to roll 2F and place on the top in the middle to add the finishing touch. It should look something like pictured below.

4.06.png

To style your wool succulents, you could place them on a small pot, or perhaps a tray, and that’s it. You have created some plants that require no care that will brighten up your space! We would love to see how yours turned out as well. Tag us on Facebook @wonderfil, instagram @wonderfilspecialtythreads, or using the hashtag #wonderfil. Happy crafting!

4.26.png

Hand Sewn Cat and Dog Finger Puppets

WonderFil Specialty Threads

Finger-Puppet.jpg

If you have little ones at home or are looking for something fun and easy to pass the time, we have a neat craft that you just might like. Whether you have pets or not, you may know they can be a bit messy. Making these cat and dog finger puppets is a way to create the pets with no additional clean up!

1.png

To get started you can download our free pattern here: https://bit.ly/3bAcYxG. It will look as pictured below:

2.png
3.png

Once you cut out all of the paper pieces then keep them organized for each animal. Next we are going to get our wool ready. We recommend using Sue Spargo 100% merino wool packs in size 1/64, with colors grey, brown, and orange. These come with an assortment of colors in the perfect size for your finger puppets. If you want to purchase these packs from home you can follow the link: http://shopwonderfil.com/product/merino-wool-packs

4.png

Next thing you are going to do is cut out your pattern pieces out of the wool in the color combinations of your choice. We pinned the pieces to the wool to keep them in place while cutting. We chose to do a medium tan for the body, light tan for tummy and snout, dark brown for ears, spots, and tail, and then black for eyes and nose. The outcome is pictured below:

5.png

Next we are cutting the cat out. We used a darker orange color for the body, a light tan for the tummy and snout, pink for the ears and nose, dark brown for the stripes, and then black for the eyes.

6.png

In order to assemble these finger puppets we need thread. There is a thread line that actually comes in all matching colors to the wool, called Ellana which is a thicker thread, and then there is also a thread line called Efina that will also do the job well and is a much thinner thread. We suggest either, as they are both excellent threads and will help you effortlessly create this project and perhaps many more in the future. Whichever thread you chose we suggest the colors 50, 30, 02, and 51. These are all quite basic colors and are great to have on hand for any projects. The threads we recommend are pictured below. You can also purchase by stopping by here for

Ellana: http://shopwonderfil.com/product-category/ellana

And here for Efina: http://shopwonderfil.com/product-category/efina

Getting Started with Whitework Tutorial.00_05_01_21.Still007.jpg

To sew the puppets, you are going to want to hand applique all of the details on the front and then the back before sewing the sides. You can do any stitches you want, if you are new to sewing you may want to try a running stitch, which is just a standard in and out stitch.

Or you can try something a little fancier such as a blanket stitch, like we did on the belly of the dog.

Once you have the details all stitched on then we are going to do the sides. For the dog you can insert the ears into the sides because we are going to enclose it into the seam.

10.png

We used Wonder clips to hold the ears in place while we started stitching. Next you can do any stitch you like to close the sides. We chose to do a back stitch, as this will also easily keep the ears in place as well. When you are all done it may look something like pictured below:

11-600x316.png
12-600x320.png

The cat’s ears are just part of the body and do not need to be enclosed, so once you sew the details on you can sew around the outside and it is all done. We also chose to add a little extra decoration and gave it whiskers with a few little strands of thread around the nose. The final puppet will look something like this, but you can choose how to decorate yours however you choose!:

13-600x316.png

We hope that you enjoyed making this project! Everything is open to interpretation and we would love to see how yours turned out. Time for a finger puppet show! Tag us on Facebook @wonderfil, instagram @wonderfilspecialtythreads, or using the hashtag #wonderfil. Happy crafting!

14.png

Getting started with White work

WonderFil Specialty Threads

With everyone having a little extra time at home lately, why not try a new sewing technique? There are so many interesting ways that you can use very basic tools and achieve a really cool result.

When you think of white, you may think it is boring or basic, but today we are going to show you how it can be a lovely and subtle accent. We are going to show you how to do some White Work. White work is white embroidery stitches done on white fabric.

Getting Started with Whitework Tutorial.00_05_25_18.Still014.jpg

https://www.wonderfil.ca/eleganza

Getting Started with Whitework Tutorial.00_00_54_05.Still002.jpg

STEP 1

Transfer a design to your fabric. You can use our free design by following the link here: https://bit.ly/2UaxNed. Place transfer paper face down on fabric and press into the design by tracing it with a pen or rotary wheel.

Getting Started with Whitework Tutorial.00_01_10_22.Still003.jpg

STEP 2

Hoop your fabric. This will make a nice tight surface to work on.

Getting Started with Whitework Tutorial.00_01_36_17.Still004.jpg

STEP 3

Outlining. We are using a basic stem stitch.  In order to do the stem stitch you must secure your thread on the wrong side. Bring needle to the right side of the fabric on the outline of your design. The needle should be pointed towards the left, with the stitches being worked from left to right. This can be somewhat compared to a backstitch where you stitch back towards the last stitch you made. Pick up a few threads of fabric on the outline of your design.

Getting Started with Whitework Tutorial.00_01_45_21.Still005.jpg

When you pull it through then come back up though the fabric in the middle of the stitch you just made on the line of your design. Pull the working thread through and insert the needle again on the line of the design you are following. (stitch pictured below)

Getting Started with Whitework Tutorial.00_02_22_05.Still006.jpg

Outline areas of this design that you are not going to do open work with. (for our design, the lower part of the bee)

STEP 4:

OPEN WORK DESIGN

Getting Started with Whitework Tutorial.00_05_01_21.Still007.jpg

How to do it: Outline the area with a straight overcast stitch. This stitch could be compared to couching. You use one strand of thread and with another threaded needle hold it in place.  Place a single strand of thread on the design you are outlining. Thread a needle with a new piece of thread and then the stitches will go from left to right, keep the needle in a vertical position. Secure thread through needle on wrong side of fabric and pull through below the single strand of thread and insert back through fabric right above the single stand of thread.

Getting Started with Whitework Tutorial.00_03_58_10.Still009.jpg

Now we are going to enclose these open fabrics of the thread with a tight straight overcast stitch. This can also be considered a whip-stitch. You are really just wrapping around the open lines of the fabric. First do horizontal lines of the grid and then do vertical.

Getting Started with Whitework Tutorial.00_04_25_19.Still010.jpg

Once you have stitched around everything in the grid it will look like this:

Getting Started with Whitework Tutorial.00_04_36_12.Still011.jpg

STEP 5:

filling in the shapes. We are going to be using a satin stitch to fill in the bigger parts of our design. Keeping your stitches close together, alternate between long and short stitches. Start your next stitch across from, but not next to, the end of your last stitch. Don't try to make your next stitch come up right beside the end of the last one -there won't be enough fabric in between, and you'll have a little gap of fabric peeking through each stitch, when we want them as close to side-by-side as possible. 

Getting Started with Whitework Tutorial.00_04_47_21.Still012.jpg

When the shape is filled it should look something like this:

Getting Started with Whitework Tutorial.00_05_22_19.Still013.jpg

Whether you repeat the steps for the rest of the design, or like to stitch similar sections at once you can do any order you like.

In the end your design will look something like this:

Getting Started with Whitework Tutorial.00_05_26_07.Still001.jpg

Just by using these three easy stitches we were able to create this cute little bee design. If you try out this design we would love to see the results.

Our Featured Teacher: Angela Wolf

WonderFil Specialty Threads

cbddbc95-5991-4e39-866d-bbc06bab4d39.jpg

Angela Wolf

Angela Wolf, fashion and pattern designer, is the anchor of the PBS series It’s Sew Easy and Host of Behind the Scenes and Sewing News LIVE weekly facebook shows. Author of How to Start a Home-based Fashion Design Business, founder of Angela Wolf Pattern CollectionTM , blogger, vlogger, and brand ambassador for Brother. She teaches online classes on Angela Wolf Academy, Bluprint (formerly Craftsy), and Patternreview, with over 150,000 students from all over the world.

Angela started sewing at a young age and continued to design women’s apparel all through college. With an entrepreneurial spirit and passion for fashion and sewing, she launched and ran a successful custom apparel and alteration business for over 18 years. She is the winner of 2008 Passion for Fashion, 2012 American Sewing Expo’s teacher of year, and spends her time speaking and teaching all over the country. When she is not sewing, you will find her fishing on Lake Michigan or in the Florida Keys with her husband Winn, on the Win-n-Angel!

A Touch of Lace By Angela WolfEmbellishing using lace and thread to add to your garments

A Touch of Lace
By Angela Wolf

Embellishing using lace and thread to add to your garments

5062_STILL_013_retouched.jpg
It's Sew Easy Studio

It's Sew Easy Studio


Q&A INTERVIEW

Q: As I understand, couture means designing very unique and specific pieces. Where do you draw inspiration for your designs?

A: I like to add a Touch of Couture to my garments. My jackets typically include hand dyed silk charmeuse linings, hand crocheted trims, and custom embellishments. If can’t find the fabric, I design my own by embellishing with embroidery, thread painting, quilting, needle felting, and couching - I love designing fabrics! It’s the fabric that starts my creativity, followed by draping – then the design comes to life. For the 18 years I designed custom apparel, I would design a garment to compliment that one individual choosing style, color, and fit that would flatter them. Now, I design patterns for the home sewer, offering a stylish option for them to start with and add their own creativity. I am blown away by the beautiful garments shown off by sewers all over the world in my Angela Wolf Patterns group.
link: https://www.facebook.com/groups/AngelaWolfPatterns/

Q: What do you love about using Softloc™?

A: Last spring, Andrew gave me a sample of Softloc to test out. I used Softloc in the serger and coverstitch machine on knits, which passed with flying colors. The true test was on fabrics other than knits: rayon, silk charmeuse, silk chiffon, tweed, cashmere, stretch velvet, and denim. I experimented with 3 and 4-thread overlock, rolled hem, narrow overlock, coverstitch and double coverstitch and they all turned out beautiful! Not only that, the softness of the seam finishes inside the garment are so soft against the skin. I must laugh; I have always promoted using Wooly Nylon on baby clothes offering a soft finish on the seams. Now with Softloc, we can all have fabulously soft seam finishes at any age! Just another touch of luxury in our custom garments.

Q: What can we expect from you in the upcoming year?

A:I have quite a few new products coming out, including virtual classes, a new line of athleisure styles for the Angela Wolf Pattern Collection which will include boxed kits, expanding the Fashion Sewing Club and Angela Wolf Academy Online Classes, and getting ready to tape season 19 of It’s Sew Easy tv. It’s hard to believe we taped the first episode of It’s Sew Easy 10 years ago!

The Softloc thread is a perfect fit for my new athleisure pattern kits. Each kit will include a pattern, fabric, and supplies needed for sewing the project. Sewing garments has to be fun and wearable, these new patterns are stylish and easy to sew. Just another tool for sewing success!

With a travel schedule full of events, I am very excited for the launch of the virtual classes. These classes offer a live class, without the usual hug 😊. Different from my online classes, these classes are streamed live allowing me to teach, take questions, and connect sewer’s from all over the world on a user friendly platform. Sewer’s can join the class from the comfort of your home or join a group at a local fabric store, sewing machine dealer, or sewing group that hosts the class. These virtual classes will also offer a great opportunity for fabric and sewing shops to host group events.


Thread Talks: 4 Popular Thread Myths You Should Ignore

WonderFil Specialty Threads

thread-myth-thumbnail.jpg

There are a lot of sewing myths out there, and many of them were started because of the lack of thread technology advancement or a lack of other choices. While this is no longer the case, many of these myths are still around, so we’re debunking these 4 popular thread myths that are simply no longer true.


Thread Myth #1: Always Use the Same Thread Top & Bottom

One of the most common thread myths we hear is that you must always use the same thread on the top and in the bobbin. This is simply not true, and here’s why. As your machine sews, the top and bottom threads are pulling against each other for tension.

thread-myth-image-2.png

By choosing a finer bobbin thread such as our 80wt cottonized polyester called DecoBob™, the bobbin thread will always give way to the top thread. This allows for a smoother tension and fewer thread breakages.

If you’re using a 50 or 40 weight thread to sew, which is the most common medium weight thread, the thread adds more extra bulk to the seams than most realize. This 80wt bobbin thread is almost half the size of 50wt thread in comparison, and as a result will allow the stitches to lay flatter and the bobbin thread will show less.

thread-myth-image-4.png
thread-myth-image-3.png

This is most especially noticeable in embroidery where you have a lot of dense stitching all in an area. In this embroidery, the top section used a 50wt white bobbin thread. Below it, we switched to a white 80wt pre-wound bobbin. You can literally see the difference it makes simply by choosing to use a finer thread in the bobbin.

thread-myth-image-5.png

Thread Myth #2: Embroidery Thread is Always 40wt Polyester

While we’re on the topic of embroidery, another thread myth we frequently hear is that an embroidery thread should always be a 40wt polyester. Don’t get us wrong, we LOVE 40wt polyester for embroidery and it’s a great choice, but you can also achieve better results by changing up your thread depending on what kind of embroidery project you’re doing.

red embroidery-comparison.jpg

For instance, we stitched out several sizes of this embroidery pattern going from larger to smaller. The embroidery at the larger size looks great (top left), however as you get smaller and smaller, you start to lose the detail and the lines become squished together (top right). Any embroidery with many fine details benefits from using a finer thread.

Here we used DecoBob™ 80wt thread in the top and bobbin and you can see how many details are kept at a smaller size.

Same size embroidery design using 40wt thread on the left and 80wt thread on the right.

Same size embroidery design using 40wt thread on the left and 80wt thread on the right.

thread-myth-image-10.png

For another comparison, we stitched out some lace using a 50wt cotton. We then stitched out the same lace pattern using DecoBob™ 80wt thread and you can see how many more details show up in the lace with the finer thread. So if you’re doing any embroidery with a lot of little details, always choose a fine thread to make it with. The results are worth it.

However polyester isn’t your only choice for embroidery thread, what about rayon? Rayon and polyester have some differences.

thread-myth-image-11.png

These are both good choices for embroidery, but knowing the properties of each material will help you make a more informed choice when choosing the best one for your project. Don’t forget that cotton thread is also a beautiful embroidery choice as it offers an organic, matte look. And metallic thread which is also a stunning choice for anything you want to pop.

Machine embroidery using 40wt rayon thread, Splendor™

Machine embroidery using 40wt rayon thread, Splendor™

Machine embroidery using 40wt polyester thread, Polyfast™

Machine embroidery using 40wt polyester thread, Polyfast™

Machine embroidery using 12wt cotton thread, Spagetti™

Machine embroidery using 12wt cotton thread, Spagetti™

Machine embroidery using 40wt metallic thread, Spotlite™

Machine embroidery using 40wt metallic thread, Spotlite™


Thread Myth #3: Metallic Threads Are Fickle and Always Break Too Easily

Metallic threads have a reputation for being fragile and difficult to sew with. However it’s best to keep in mind that

1) not all metallic threads are made with the same quality.
2) thread technology has advanced from the last few decades and many of the previous problems have now been addressed.

Spotlite Thread.jpeg

This is Spotlite, a metallic thread made by WonderFil threads. Something that makes it unique is that it uses rayon for its core, meaning the metallic foil is wrapped around a core thread made of rayon.

thread-myth-image-15.png
thread-myth-image-14.png

Many companies opt for polyester as the core due to its strength, however we chose a rayon core because rayon has ZERO stretch to it. As polyester tends to carry more stretch to it, as the thread goes through all the bends in the machine, the thread can stretch around those corners, causing it to break.

thread-myth-image-13.png

As rayon carries no stretch at all, this causes significantly fewer thread breaks and allows for a smooth sewing experience. It also means that stretching doesn’t pull the metallic foil away from the core, which would change the texture and reveal a different colour in the stitching.

Machine embroidery using 40wt metallic thread, Spotlite™

Machine embroidery using 40wt metallic thread, Spotlite™


Thread Myth #4: Polyester Thread Cuts the Fabric So You Should Only Quilt with Cotton

This is one of the most common thread myths we hear because decades ago there was some truth to it. Since then, thread technology has made leaps and bounds in advancement, and polyester threads have become one of the easiest and best choices to sew with. Not only does the polyester thread not damage the fabric it is sewn into, it actually lasts longer and is more resilient than cotton over the years. It also carries next to no lint, meaning you’ll need to clean out your machine less frequently.

thread-myth-image-17.png
Longarm quilting using 100wt cottoninzed polyester, InvisaFil™

Longarm quilting using 100wt cottoninzed polyester, InvisaFil™

Always keep in mind that not all threads are made with the same quality. Many people spend thousands of dollars on a sewing machine only to feed it low quality thread that can cause all kinds of problems. Always choose a quality thread line to see the best results in your projects and save yourself the headache a low quality thread can cause!


Thread Talks: Thread Terminology

WonderFil Specialty Threads

Screen Shot 2019-09-27 at 1.22.25 PM.png

There’s a lot of different terms used in the sewing world, so what do they all mean? In this post, we break down the variety of terms used in the thread industry, what they stand for and why we use them. Get threaducated in our Thread Talks videos, become a savvy thread expert and expand your knowledge of the sewing industry!


Thread Weight

The sewing industry uses thread weight to describe the thickness or thinness of a thread.

thread+terminology-2.jpg
thread terminology-3.png

For instance, a 100 weight thread will be super fine, while an 3 weight thread will be closer in thickness to yarn.

While this term is used almost ubiquitously by sewing companies, there isn’t really a definitive system to measure it. Most manufacturers know how thick a 40 weight thread looks like and will use that as a reference point to base other thread weights on. However, since there is no definitive system to measure thread weight, you might find some minor variation between thread weights from different thread companies.


Tex:

Another way to measure thread thickness is by tex. This is a more technical way to measure thread as opposed to weight. It is defined by how many grams 1000m of that yarn weighs.

thread terminology-4.png

So for example, if 1000m of a certain thread weighs 20 grams then it’s tex 20. Or if 1000m of the thread weighs 30 grams, then it’s tex 30. With tex, the higher the number, it usually results in a thicker thread. Whereas with weight, it’s defined by the higher the number, the thinner the thread.

thread terminology-5.png

* Find out how thread weight is defined here: 🎬 Sausage Theory Video

However if you have a denser thread, or the thread is made from a heavier material such as steel wool, you might end up with a higher tex despite the strands not being a smaller diameter than a cotton thread with the same tex. This is why we use weight to measure most of our thread lines, with some exceptions.


Mercerization

Mercerization is a standard process used on cotton yarn. You’ll notice that almost all cotton sewing thread is mercerized, but what exactly does that mean?

thread terminology-6.png

Cotton yarn is mercerized by soaking hanks of it in a caustic soda that is pulled and stretched repeatedly between rods. This process loosens the fibres to help it absorb dye in the next stage of manufacturing.

However as a result of this process, it also slightly increases the strength of the cotton and gives the yarn a silkier, more lustrous appearance. Natural raw cotton material is dull looking, however a mercerized cotton has a soft gloss to it.


Long Staple Egyptian Cotton (or Giza Cotton)

Cotton is made up of multiple fibres that is taken and spun together into strands to make thread. The best quality fibres are the longest fibres as these will create a significantly less linty thread. You can see this for yourself by taking longer strands of hair and twisting them, then doing the same with shorter strands of hair.

thread terminology-7.png

The longer hair has fewer ends poking out than the shorter strands of hair. This is what the term “long staple cotton” is referring to.

WonderFil manufactures all of its cotton thread only from long staple cotton, one of the highest calibres of cotton fibre quality. This cotton can only be grown in moist, mild climates, a few of which can be found in the southern United States or the delta region of Egypt. Even in Egypt there is variation in climates. For instance, Giza cotton is an extra long staple Egyptian cotton grown in close proximity to the Nile river, a veritable oasis in the otherwise dry climate. Because of the Nile’s mineral rich water and the region’s warm, humid climate, it makes the perfect environment for the highest quality cotton to be grown. For example, Efina™ thread is manufactured from this extra long fibre to create a clean, ultra low lint thread that looks and feels gorgeous.


Gassing:

Gassing is a process some thread manufacturers do to their cotton threads to reduce its lint.

thread terminology-9.png

The thread passes between two flames, removing about 80% of the lint from its surface. WonderFil actually repeats this process a second time, so the remaining 20% of the lint has another 80% removed. This double gassing in combination with the long staple Egyptian cotton its spun from results in an extremely low lint cotton thread.

Because gassing a thread adds cost to the manufacturing process, some companies choose instead to cover the thread with glue or residue to keep the cotton fibres lying flat and give the illusion that its low on lint. However this residue will still come off in the sewing machine and can often be even more difficult to clean out than lint. Knowing whether a thread has been gassed or not is a great reference to its quality.

thread terminology-10.png

* Find out how double gassing process works here: 🎬 What is Double Gassing?

Our Featured Teacher: Felice Dahlhausen

WonderFil Specialty Threads

Claire's County Kerry By Felice Dahlhausen using WonderFil's Eleganza™ perle cotton

Claire's County Kerry
By Felice Dahlhausen using WonderFil's Eleganza™ perle cotton


bcc75065-3127-4497-a93b-28a9475e9b03.jpg

Felice Dahlhausen

Felice spent thirty-two years as a high school art teacher then moved into a new artistic path. She taught photography, drawing, painting and graphic design and is now combining those skills to develop her quilt patterns with a modern and happy look to them. She has been a quilter for over thirty years and is a teacher of NEORQC and member of two local guilds, Always in Pieces, L.O.T.A., and other fiber organizations including the Cleveland Museum of Art Textile Art Alliance, and SAQA.

Felted wool has become her favorite medium combined with cotton fabrics and LOTS of embroidery stitches! Her goal is to strengthen her artistic work and learn new techniques that will provide growth in the skills she uses. She says, "I love sharing the processes with others and enjoy that as much as creating the works. I have created patterns for others to use but also welcome opportunities to teach techniques."

Q&A INTERVIEW

Q: You approach quilting from an artist's perspective. What attracts you to wool appliqué?
A: I love the variety of colors in the threads, and variations inherent in hand-dyed wool. I also love how it feels, and I feel it shows off the stitches so well, even better than cotton.

Q: You quilt, design patterns, and teach. What do you enjoy the most?
A: I was a high school art teacher for years and I really enjoyed the kids. When I retired from that, it took me about 3 years to figure out what was going to be next. I was a quilter and started to realize how much more fun it was with people around, sharing and interacting. I belong to guilds, and love the teaching for that very reason. Being creative around others, and sharing methods and techniques is just so much fun for me!

Q: Hand work is definitely a labor of love. How long does it generally take you to complete a piece?
A: A 40" x 40" piece might take me 6 months to complete.

Q: What is your favorite WonderFil Thread?
A: Eleganza #5 is my go-to thread. I use it for most of my embroidery stitching. I especially love the variegated colors. When I pick up a variegated thread I have never used before, it is exciting to see how it reveals itself! I have just taken up sashiko, and for that I like to use Eleganza #8.

Q: I understand you have just released a new design. What else is coming up for you in 2019?
A: My newest design is titled " Pollinator Blooms". I have admired the fabric designed by Leslie Tucker Jenison and created Mazie's Garden with her Urban Garden fabrics. After seeing that piece, Leslie invited me to create something with her new fabric line Pollinator by RJR Fabrics. So I sent the word out to my followers, asking what they would like to see. One follower from Texas asked for a piece using cacti in bloom. Being from Ohio, it was unfamiliar territory for me, but I did some research and discovered how beautiful their blooms were.

My "Pollinator Blooms" piece has been accepted for the IN Full Bloom Exhibit at the International Quilt Festival in Houston. I also have a piece (Claire's County Kerry) that has been accepted into the Zanesville Museum of Art's 74th Annual Show that is running this summer in Zanesville, OH. That is exciting to me, as it will be exhibited alongside a variety of artwork. I will also be teaching some locally in the summer, then in October I will be going to Artistic Artifacts in VA to teach a two day workshop with Pollinator Blooms blocks.


Mazie’s Garden 26” x 30” Felice Quilt Designs

Mazie’s Garden 26” x 30”
Felice Quilt Designs

Using WonderFil’s Eleganza™ variegated color #EZM20

Using WonderFil’s Eleganza™ variegated color #EZM20

Pollinator Blooms By Felice Dahlhausen

Pollinator Blooms
By Felice Dahlhausen

Our Featured Teacher: Kerry Karram

WonderFil Specialty Threads

Sewing Kit By Kerry Karram Using Dazzle™ and Eleganza™

Sewing Kit By Kerry Karram
Using Dazzle™ and Eleganza™


94590947-c830-416d-a49a-4faf2868fb02.jpg

Kerry Karram

3 decades… that’s a long time to teach quilting!  Kerry Karram, fiber artist, pattern designer, writer and award winning quilter, has guided hundreds of students on patchwork and applique in this time. Always evolving, her recent focus has been wool work. Her passion is hand embroidery and embellishment on multi textural fibres. She has been hand dyeing felted wool, linen and velvet in small batches since 2002, and is the owner of Wool Penny Rug Supplies. Her kits and wool have been shipped all over the world.

Q&A INTERVIEW

Q: How did your company, Wool Penny Rug Supplies, come to be ?

A: Back in 2002, I took a class in Sisters, OR with Barbara Crib, on wool appliqué. The class required students to bring dyed wool, and I absolutely couldn't find any where I was. So I went to the thrift store, bought some white and cream wool skirts, and dyed my own. I found out that I loved the process! So much has changed since then. At the time there was no choice of threads for that type of work either, apart from embroidery floss. I saw a real need, so I started dying wool, and Wool Penny was born.

Q: What are your thoughts on the new trend of wool appliqué?

A: I think, in this busy world, people are looking to calm down, slow down and downsize. I have been teaching quilting for 34 years. In the early days, a class would be full of machines going at full speed and joining piles of fabric all day. By the end of the day, students would be exhausted from trying to piece a large quilt in a day. Now I find people are loving smaller, simpler projects. Quilting also requires a lot of space, which many people don't have.  Cost is also a factor, and people can get into wool appliqué for a relatively small initial cash outlay, so that makes it appealing. Still, the two worlds are joining together, as people will spend the time to do their hand, wool appliqué work, then take it to a custom quilter to have it quilted. I think that is fantastic, and produces some really beautiful, unique pieces.

Q: What do your classes look like these days?

A: I usually have a maximum of 20 students, but like to keep it around 10-12 students, so they can gather around when I am demonstrating a stitch. My goal in my classes is to make people feel comfortable in their own creativity, and not feel like they have to fit into anyone's version of 'right' or 'wrong'.

Q: Do you think most people take up slow stitching for relaxation, to create an heirloom, or to make gifts?

A:  I think it is a combination of the three. Most of the quilters I know are now in their late 50's and have grandchildren coming. Rather than just restricting themselves to making quilts, they are also now making wall hangings, that won't receive the wear and tear and can last for ages.

Q: What are your favorite stitches? Favorite threads?

A:    My favorite stitches are the drizzle stitch, colonial knots and the fly stitch. I like to use drizzle stitches and colonial knots for filler, because they give such great texture. My favorite thread is WonderFil's Eleganza #5. If I need a bit of sparkle, I will chose Dazzle, and I love Razzle for the shine and vibrant color.

Q: What is coming up for you in 2019?

A: I have a piece accepted into the juried show at Quilt Canada, and also have one entered in the Grand National Exhibition. I am going to teach some classes in Juno, Alaska in June. Last year, I entered 7 pieces in the Fall Fair on Pender Island, and all 7 pieces won; that was a fun surprise!


Raven By Kerry Karram Using #5 Eleganza™ and Razzle™

Raven By Kerry Karram
Using #5 Eleganza™ and Razzle™

Peacock Feather By Kerry Karram Using #3 and #5 Eleganza™, and Razzle™

Peacock Feather By Kerry Karram
Using #3 and #5 Eleganza™, and Razzle™

Our Featured Teacher: Susan Slesinger

WonderFil Specialty Threads

Cattails By Susan SlesingerRecently shown at the Patchwork and Quilt Show in Mexico City, uses InvisaFil™ in the bobbin, InvisaFil™ for the raw edge applique and to stitch down the couching.

Cattails By Susan Slesinger

Recently shown at the Patchwork and Quilt Show in Mexico City, uses InvisaFil™ in the bobbin, InvisaFil™ for the raw edge applique and to stitch down the couching.


cb88dd08-24ba-45f5-9cf0-6784384c16a1.jpg

Susan Slesinger

Susan Slesinger has been embroidering, sewing and knitting since she was about three. She is completing her City and Guilds level-3 Certificate in patchwork and quilting with Linda and Laura Kemshall of Design Matters. Her passions include art quilting, wearable art, and fabric postcard exchanges.Susan enjoys introducing novices to the joy of sewing as well as unleashing her students’ creativity. Her work has been featured in Designs in Machine Embroidery, America from the Heart, Creative Quilting, and The Secrets of Digital Quilting. Her quilts and garments have been displayed nationally and internationally at the Festival of Quilts (Birmingham England), the International Quilt Festivals (Houston, Chicago and Long Beach), Pacific International Quilt Festival, and Road to California.When she is not teaching or sewing, she rides a tandem bicycle with her husband, listens to and composes music, and is a volunteer ski instructor for people with disabilities.

Susan loves unleashing her students’ creativity and is a member of C & T Publishing’s Creative Troupe.  She  enjoys introducing novices to the joy of sewing, and teaching experienced sewers all about the fabulous features on the top-of-the-line Berninas.

Q&A INTERVIEW

Q: You have been sewing since an early age. How did you learn to sew?

A: My mother taught me hand sewing, and my great aunt was a wonderful dressmaker, so she taught me the machine sewing. Growing up in London, UK, the girls were taught to cross stitch when the boys went out to play cricket! I moved to the US in 1974 to get my MBA in international business (I also have 3 degrees in music). For much of my career, I worked in the hospital/government sector in Pasadena, and  for an international health care company. I started to teach sewing towards the end of getting my music doctorate.

Q: You are skilled in all types of creative work. What is your favorite?

A: My favorite things to make are small art quits and fabric postcards.

Q: Is there a skill or technique you teach that you love to teach?

A: I like to teach beginner classes and get people well started on the basics. I also enjoy teaching machine quilting, and I love to teach customers how to use the new high end Berninas.

Q: Do you have a favorite WonderFil Thread?

A: I love InvisaFil™. I use it in my bobbin when I am making art quilts, and for applique and as a top thread when I am couching, so the couched thread looks like it is floating on the fabric. I like the way it disappears , and I feel it behaves so much better than a monofilament. I also like to use the 12 wt Fruitti™ for finishing the edges of my postcards. When I use a close set satin stitch with the heavier thread, it does such a nice job of the edge finish.

Q: What do you have coming up in terms of shows or classes?

A: I have 3 quilts in a show in Mexico City. I also teach 3-4 days a week, mostly in local shops. The rest of the time, I keep busy creating!


Royal Progress By Susan SlesingerUses InvisaFil™ for the bobbin and couching and Mirage™ (rayon) for the blue quilting.

Royal Progress By Susan Slesinger

Uses InvisaFil™ for the bobbin and couching and Mirage™ (rayon) for the blue quilting.

Square Root By Susan SlesingerUses InvisaFil™, Splendor™ (rayon) and Spagetti™ (12 wt cotton thread).

Square Root By Susan Slesinger

Uses InvisaFil™, Splendor™ (rayon) and Spagetti™ (12 wt cotton thread).

Our Featured Teacher: Donna Kendall

WonderFil Specialty Threads

Too Sexy for My Feathers by Donna Kendall

Too Sexy for My Feathers by Donna Kendall

d91f746e-bbd2-456b-b771-2f2b9b16223d.jpg

7bec3318-0518-4027-829f-fd46111e5d01.jpg

Donna Kendall

Donna is a special community minded individual, who relentlessly volunteers her talents and positive energy to make her community a better place. Her many attributes include: incredible sense of humor, persistence in completing a truly unique and stunning design, free motion quilting speed, abilities to create a masterpiece from any assorted fabrics, and sharing knowledge about fabrics &  threads. 
 Donna believes that your best work comes from errors, and fixing them.  Ignore the quilt police. Quilt police are merely people who do not think and act outside the box. Donna’s inspiration comes from working out problems in her head - whether it is just an idea or  work related and/or grief and loss.  The quilt becomes a sort of sideline and just happens in the process. 
When designing quilt pieces, her major assistant was a German Shepherd/Malmute dog - Jessie.  She was a true born designer.  Donna’s design wall was downstairs - a place she rarely frequented.  However, if there was something wrong with a quilt design, Jessie walked by the design wall, several times, wagging her tail fiercely and knocking the pieces on the floor.  Needless to say, many were redesigned - and much improved.  This dog has been truly missed.  Her replacement, Pheebee - much smaller - was a professional quilt dog.  If she saw a quilt she liked, she claimed it as hers. 

Donna says her goal is to use up all the fabric she has!

Q&A INTERVIEW

Q: You do a lot of thread work, from thread painting to hand stitching. What started your love affair with thread?

A: String.  When I was a small child, I loved string and would travel with my dad to all his places where the guys saved balls of string for me.  My 93 year old father still has one of these balls - he has saved it in his shop.

Q: You teach a Thread Boot Camp. Tell me a little about what you do there.

A:  I teach people how to use all of the threads in their machines.  It is a fun filled day and everyone learns to turn the dials and play with needles and tensions and get a basic understanding of thread.  We have students come back two or three times (repeat offenders) and finally get the grasp of it all and away they go.  Some even grasp it all the first time.  The more they play in a group, the more they explore on their own.

Q: Are you surprised about how much or how little your students know about thread?

A: No I am not surprised.  You can walk into just about any store and ask about thread and they know a bunch of talking points...  mostly noise...  very little useful information about what to do when it breaks, twists, annoys you.  If the stores do not know - there is nowhere else to learn.

Q: What is your favorite technique to teach?

A:   I like to teach students that their machines will not blow up if they  turn the dials or adjust the tension or break a needle.  I teach them to breathe and to think.

Q: What are you favorite WonderFil Threads?

A:    Tutti, Mirage, Hologram, GlaMore, Sue Spargo's threads, InvisaFil  AND  DECOBOB.  DecoBob is my go to work horse.  The rest are all my Sunday horses.

Q: What is coming up for you this year?

A: I have numerous Boot Camps and Quilt Guild Shows coming up,   all the way from Cranbrook, BC to Winnipeg, MB.  Once the fibre artists learn how to use thread in all sorts of ways, they are hooked.


Oh Sue - Look What You Started Hand Stitched by Donna Kendall

Oh Sue - Look What You Started Hand Stitched by Donna Kendall

Our Featured Teacher: Kerry Green

WonderFil Specialty Threads

Pretty in Pink By Kerry Green

Pretty in Pink By Kerry Green

Kerry Green

Kerry remembers being fascinated as a child watching her grandmother crochet and embroider. She was  10 years old when the church offered summer classes in embroidery, crochet and knitting. Her love of needle arts has continued to grow.

Quilting became her focus about 30 years ago, especially needle-turn appliqué and embellished wool appliqué. She confesses she still gets excited watching a project come to life as she adds embroidery stitches.

When teaching, Kerry urges students to choose a fiber and color that will enhance, rather than match, their appliqué.  She finds it very rewarding to watch a student’s excitement build as they learn a variety of embroidery stitches and dare to use new colors and fibers.

Kerry lives surrounded by mountains near Salt Lake City, Utah with her husband of 49 years and their 2 dogs.  Rarely does a day pass by when she doesn't spend time with needle in hand.

Q&A INTERVIEW

Q: Have you been hand stitching for a long time?  What drew you to this art form?

A:  I learned to embroider when I was about 12 years old. I used to watch my grandmother stitch, crochet and knit, and I remember being fascinated. I started to take sewing lessons when I was 12, so I have been basically been sewing my whole life. I love to create, and that feeling of accomplishment I get. I have been focused on wool appliqué for about 10 years now. I just love the way the appliqué pieces change when you add embellishing stitches... it really brings each piece to life.

Q: Do you find that classes in hand stitching are growing in popularity?

A:  I do find that more and more people are drawn to this art form. They are drawn to the beauty of it, and love how easy it is. I have students tell me " I just can't leave appliqué plain anymore. I have to add stitches!".

Q: Do you have one stitch that many get excited about?

A: I find that most people are excited to learn the bullion knot and the drizzle stitch. I also like to teach them to combine several stitches to create something new.

Q: What is your favorite WonderFil thread?

A:  My favorite thread is Dazzle. I love the hint of sparkle; it is eye catching without being overwhelming.

Q: Tell me about your 2019 events?

A:  I am mostly teaching locally. I will be releasing a new block of the month pattern. My last Block of the Month was called 'Solstice' ( which used a lot of Dazzle) . My new Block of the Month will be 'Nocturne'. I have a stitch along group on Facebook that has a lot of loyal followers.


Marsh By Kerry Green

Marsh By Kerry Green

Sneaky Spider By Kerry Green

Sneaky Spider By Kerry Green

Our Featured Teacher: Shelly Fitzgerald

WonderFil Specialty Threads

Thread Painted Flower

Thread Painted Flower

42a744ed-54ab-4908-9c33-2b2db9ffd881.jpg

Shelly Fitzgerald

Shelly has been sewing and crafting all of her life. She freely admits to reading all the machine manuals for pleasure and then loves teaching what she has learned to her classes. She makes learning fun, not hard and leaves everyone excited about their new tools and skills.    

Shelly is a Bernina Educator. Through her company, Sew Shelly Quilts, LLC, Shelly creates and presents original patterns and classes to bring the extended capabilities of all of the BERNINA products to life. Her classes are rich with techniques and software is her passion.  In addition, she is a 5 year member of the BERNINA Event Team which has brought the Sewapalooza to you.  

Q&A INTERVIEW


Q: How did you learn to sew?

A: Both my mother and my grandmother were skilled seamstresses. I can remember being very small, sitting on my mother's lap, hand stitching clothes for dolls. By the time I was 12, I was sewing everything I wore.

Q: You seem to have a real love of the sewing machine. How did that start for you?A:  I seem to have a very mechanical mind. It just comes naturally to me. I never watch tv. Instead, I am digitizing, or reading machine manuals, or working on my computer. Machines fascinate me, and I am really fascinated by the way the machines interact with thread and fabric to create something beautiful.

Q: How many machines do you own?
A: I have 9 Berninas! Every time it seems like time to get rid of one, I just can't let it go; they become like my best friends. I remember something I made with that machine, then I get sentimental and can't part with it!

Q: What is the one technique you teach that most often gives your students their "ah ha" moment?
A: I think they are always really thrilled when they learn how to do bobbin work! They get real excited when they see the effect that can be achieved when they put the heavier thread in the bobbin and work upside down. They are also always amazed at the effect that can be achieved with couching.

Q: Do you have a favorite technique?
A: I especially love embellishing fabric, so I like to do decorative stitching, or couching; any kind of embellishing, really. When I am not playing with digitizing, that is what I like to do.

Q: What is your favorite WonderFil thread?
A: First, it is Razzle (8 wt rayon)! Because I love to teach couching and bobbin work, Razzle™ is just the best for that, and it gives such stunning results. But my second new favorite is InvisaFil™. I have just recently started using it for stitch in the ditch, and you simply cannot see it in that ditch! So even when your stitching goes off a bit, the end result looks great.

Q: What is coming up for you next?
A: Well, I seem to be on the road constantly. I am doing the Bernina Academies (we are now using WonderFil's reflective thread, Flash, which incidentally sews like a dream!). Then I also travel to dealers teaching the O Sew Shelly techniques classes .


YouTube is another favorite way of Shelly’s to engage stitch enthusiasts world wide. She has many up close videos on techniques that can be used with various materials and machine feet.

Embellished Hat

Embellished Hat

Bobbin Work Using WonderFil's Razzle™

Bobbin Work
Using WonderFil's Razzle™

Our Teacher of the Month: Peggy Kwan

WonderFil Specialty Threads

By Peggy Kwan Using WonderFil's PolyFast

By Peggy Kwan
Using WonderFil's PolyFast

679370f1-874f-4b16-8db1-6bc9b8c0548d.jpg

Peggy Kwan

Peggy Kwan was a registered nurse with a very busy Toronto hospital Emergency/Trauma Centre for over 26 years  before her retirement. The craft of quilting was her form of relaxation after a hard days work.
Peggy has been a speaker and instructor at shows, quilt shop and quilting guilds across Ontario for many years. She has won numerous awards and her work has been exhibited in many places, including a commission piece displayed at St. Joseph’s Long Term Care & Rehabilitation Centre. She is a members of Markham Guild of Village Crafts and Markham Town Quilters Guild.

Q&A INTERVIEW

Q: You had a career as an RN. How did you end up as a quilt instructor?

A:  I worked in the first major trauma center in Canada, Sunnybrook in Toronto. As you can imagine, your adrenaline is high every day, and there is a high burnout rate at this type of job. I had a friend suggest that I take up quilting as a way to relax. It was a life saver for me. I was at the trauma center for 26 years. I never would have lasted that long without my quilting! When I retired, I just moved on to teach my form of quilting.

Q: You do a lot of thread painting and hand work. Do you have a favorite technique?
A:  I am not really someone who likes to do a lot of piecing. I love to do appliqué and handwork. I find that I always feel challenged, which I enjoy.

Q: You have a unique technique when you teach...
A:  I do my construction differently. I compose pieces block by block, with all three layers at a time. I see fibres differently. At first the students didn't know how to take it, but now I have a following of people doing my technique. Because it is different and not for everyone, I always invite a new student to come and take their first class for free. Then if it is not for them, they have no commitment. My classes are growing!

Q: What is your favorite WonderFil Thread?
A:   I use PolyFast a lot, as rayon doesn't work for my 'construction' style of quilting. I love the Sue Spargo Eleganza for my hand work and the color changes in FabuLux are beautiful and work really well for what I do. And of course, I always use DecoBob in the bobbin.

Q: What is coming up for you this fall?
A: I teach often for the Markham Guild, and at Village Craft every Wednesday. Come and check out one of my classes!


Visit Peggy's Website

By Peggy Kwan Using WonderFil's PolyFast

By Peggy Kwan
Using WonderFil's PolyFast

By Peggy Kwan Using WonderFil's PolyFast

By Peggy Kwan
Using WonderFil's PolyFast

Our Teacher of the Month: Kim Rado

WonderFil Specialty Threads

'Edith Piaf'With WonderFil Eleganza™, Sue Spargo Dazzle™ and quilted with Tutti™

'Edith Piaf'
With WonderFil Eleganza™, Sue Spargo Dazzle™ and quilted with Tutti™

 
8c24bc95-6e1f-49a1-aa38-544575eb7b60.jpg

Kim Rado

Kim is the daughter of an accomplished artist, and spent her youth around oil paints and art shows. In high school, she won her first blue ribbon for a sculpture she did. She went on to study art and public relations in college. She had careers designing ceramic jewelry, acting, and in the beauty industry, as well as founding the Rancho Santa Fe Repertory Company, where she produced theatre events, designed sets and costumes, and acted. Designing and making costumes marked her transition into art quilts. Her quilts have appeared in numerous  quilt shows, and she has been designing patterns for over 15 years. She opened her own design studio in 2007  in southern California called Starry Night Hollow. She teaches and lectures at her shop and worldwide and she is currently working on her 4th book. She designs fabric and thread (WonderFil's Kim Rado  Starry Night Hollow Dazzle collection) and her original patterns are sold in over 8 countries.

Q: Art quilting is becoming increasingly popular. Do you feel, as a teacher, that people are a little afraid to express themselves artistically?
A:  Always! My challenge as a teacher is to find ways to make it easier for students to express themselves. I try to help them past the roadblock of not believing they are good enough or talented enough.

Q: You have done a lot of pieces that focus on fables and fairy tales. What led you down this path?
A: It comes back to finding a way to help people out of their creative 'shell'. I find when I am able to take people back to their youth when they were unafraid to imagine and be artistic, it helps them to feel free to create. I feel that animals have the same effect, which led me to write the 'Feathers and Fur' book. Animals evoke a loving emotion in people, that also helps with creativity.

Q:  What is your favorite part of teaching?
A:  I love watching the discovery in student's faces, when they think they have nothing, then realize that they have a lot. I love creating alternative ways for people to create shapes and produce art unconventionally.

Q: You helped create a new line of thread for WonderFil. How did that come about?
A: That was such fun! About 3 years ago, I was set up in a booth across from WonderFil at the Houston show. I was so drawn to all the beautiful colors in their booth, that I kept going over, and I started to talk to Andrew and invited him to come over and see what I was about. He asked if I would be interested in designing a new line of embellishing threads and I jumped on it. I love the outcome. It is such a beautiful embellishing thread (see below to learn more).

Q: Besides the Starry Night Hollow Dazzle, what are your favorite WonderFil Threads?
A: That is a tough one! I love the DecoBob for appliqué, and the wool thread, Ellana. I often use Tutti for my quilting, and Eleganza for embellishing. And I have just discovered the new Glamore, which is fantastic.

Q: What are some of the classes coming up at your studio?
A: I am in the middle of writing another book, called 'Fairytales'. I will be teaching the different projects in my studio classes, and their finished work will end up in my book.


Visit Kim's Website

'The Mad Hatter's Tea Party' With WonderFil's Ellana™, Eleganza™ and Tutti™ 

'The Mad Hatter's Tea Party'
 With WonderFil's Ellana™, Eleganza™ and Tutti™


'Raffaella'From 'Feathers and Fur'Quilt embellished with WonderFil's Kim Rado Starry Night Hollow Dazzle.

'Raffaella'
From 'Feathers and Fur'
Quilt embellished with WonderFil's Kim Rado Starry Night Hollow Dazzle.

WonderFil's Kim Rado Starry Night Hollow Dazzle™One of the new threadlines WonderFil released at the Houston show this past fall was the Starry Night Hollow Dazzle. It is an 8 wt rayon, with 3 strands of different colored rayon twisted with a strand…

WonderFil's Kim Rado Starry Night Hollow Dazzle™

One of the new threadlines WonderFil released at the Houston show this past fall was the Starry Night Hollow Dazzle. It is an 8 wt rayon, with 3 strands of different colored rayon twisted with a strand of metallic. The result is a beautifully dimensional and sparkly thread that is perfect for hand embellishing, couching or for use in your serger loopers. What a great new twist to the WonderFil Dazzle line!


Our Teacher of the Month: Bethanne Nemesh

WonderFil Specialty Threads

"Solitare"Background quilting with WonderFil's InvisaFil™

"Solitare"
Background quilting with WonderFil's InvisaFil

 
Phyllis is the Hawaii regional rep for SAQA,  an international organization (StudioArt Quilters Associates).

Phyllis is the Hawaii regional rep for SAQA,  an international organization (StudioArt Quilters Associates).

Bethanne Nemesh

Bethanne is a classically trained artist, with a Bachelors of Fine Arts and a Masters in Art Therapy. The fiber arts became her art medium of choice in 1997, but her focus changed in 2007 when she purchased  a longarm sewing machine. For many years she was a custom longarm quilter for hire, but as her style became distinctive, she began teaching quilting to others and writing books to support her classes. She is passionate about teaching others to follow their own creative journey through quilting, and about expressing herself through show quilts .

Q: You have a strong arts background. How do you feel that translates into your quilts?
A:  In numerous ways. I tend to approach my quilts from an 'art first' standpoint. A lot of quilts go with traditional shapes like feathers, etc. I can appreciate that, but I don't find it is interesting to me. I tend to use my longarm machine like it is a pencil ( although it doesn't erase so well!!). Growing up with an arts background, I got used to attending gallery shows. When you go to art galleries, while you may not love every piece you see, you learn to determine the aspects of the piece you like, and decide what you can pull from the good parts of what you see to influence and improve your own art. I treat quilt shows like they are art galleries, and try to look at every piece in that way. I believe that also helps me to be a more supportive , positive teacher,  because I try to always 'critique' students work in a very positive way, by pointing out the aspects of their work that is great, while gently suggesting some areas of improvement.

Q: You are a very decorated show quilter. How much time does a typical show quilt take you?
A: There are really two answers to that question. My first answer would be '20 years' as every quilt I have made on my journey leads me to the current piece. However, since I believe you mean time for a specific quilt , not counting the designing ( which is hard to pin down, as it is something I think of and plan out over time), a show quilt can take me a year, or around 500 hours. But that can change a lot according to the finish I choose. I am currently working on a piece that is taking me 20 hours per side for the finish I am giving it. So the finish can easily add another 100 hours.

Q:  Where do your show quilts end up? Are they hanging in private collections?
A:  I have a hard time parting with my winning quilts, as I become emotionally attached to them. Some of them hang in my house if it works ( although I never design a quilt based on how it will look in my house), but most of them end up travelling with me to teaching and lecture engagements. They become good examples for me to demonstrate different techniques.

Q: What machine do you currently use?
A: I am still sewing with the A-1 I purchased in 2007. Nowadays there are so many options for long arm quilters, but when I bought my machine, there were not many choices. That being said, my machine works great for me.

Q:  What is the best tip you would give to someone who is just looking at purchasing a longarm, or just starting to use one?
A: Practice! Although that is not what most people want to hear, there really are no shortcuts. Years ago, no one would even think about purchasing an expensive longarm machine if they didn't plan on making a living with it. When you are on that machine for hours a day, working on clients' quilts, you really get a lot of time to improve your craft. I also believe if you are very experienced at quilting on a domestic machine, you will have an easier time of it. The difference is, with a longarm you are moving the ' pencil' and with a domestic machine, you are moving the 'paper'.

Q: What is your favorite part about teaching?
A: The most gratifying thing for me is the when students tell me that I presented things in such a way that they feel they finally 'get it'. Also, custom quilting and working out of your home can be very isolating, so teaching really gives me that sense of community.

Q: What is you favorite WonderFil Thread?
A: Invisafil! I work a lot with silk fabrics, and InvisaFil has just the right amount of soft sheen to work well with them. Real silk thread is far too pricey and fragile. InvisaFil has the right strength. I am also a new convert to the DecoBob bobbins. They are evenly wound, so the way the bobbin acts when it is full is the same as when it is nearly out. I find that WonderFil's plastic bobbins are also much better in my machine than the cardboard kind I used to use.

Q: What is coming up for you in 2018?
A: I will be heading up to Canada in March to present for a guild in the Toronto area, then I will be teaching at Manchester MQX, and in June, an I am presenting at Steamboat in Colorado, and plan to combine it with a family vacation! I will also be at AQS Grand Rapids, and several other shows. And I have two show quilts making the rounds now ( 'Westward Sun' and 'Song of Summer'), and have submitted  one of my quilts for the Houston show as well.


Visit Bethanne's Website

"Westward Sun"Background quilting done with WonderFil's InvisaFil™Best Longarm Machine Quilting, AQS Lancaster, 2017Excellence in Longarm Quilting, Road to California, 2017First Place, Wall Quilt Pieced, Quilt Odyssey, 2017First Place, Large Quilt: …

"Westward Sun"
Background quilting done with WonderFil's InvisaFil™

Best Longarm Machine Quilting, AQS Lancaster, 2017
Excellence in Longarm Quilting, Road to California, 2017
First Place, Wall Quilt Pieced, Quilt Odyssey, 2017
First Place, Large Quilt: Quilting is the Star, AQS Paducah Fall, 2017


04a2bb01-467c-4fee-b336-802f32d94a7d.jpg

Our Teacher of the Month: Phyllis Cullen

WonderFil Specialty Threads

"The Meaning of Hope"Thread Sketching with WonderFil's Accent™ and Spagetti™

"The Meaning of Hope"
Thread Sketching with WonderFil's Accent™ and Spagetti™

0b84bb60-6463-4bdd-b663-5376dcc4815e.jpg
 
Phyllis is the Hawaii regional rep for SAQA,  an international organization (StudioArt Quilters Associates).

Phyllis is the Hawaii regional rep for SAQA,  an international organization (StudioArt Quilters Associates).

Phyllis Cullen

Phyllis has shown, sold, and taught all over the world.  She makes her home on the beautiful Hamakua coast of Hawaii's Big Island, where she enjoys sharing her studio and her knowledge with others.

Q: How did you start down the path of art quilting?
A: I have always done art; painting, drawing, embroidery. Really, I have never met a medium that I didn't like! But when I discovered fabric and threads, and learned how much texture and the great sculptural effects that I could achieve, I was hooked.

Q: So what is your background? Did your mother sew?
A: My mother was an artist, but I learned mostly from taking a few classes and reading a lot of books.


Q:  So where do you find your inspiration?
A: I always think  "If I were a writer, would I want to write about this?." I love to tell a story with my choice of color and design. You know the old saying," A picture is worth a thousand words," so  I use my quilts to tell the story. I also want to use my works to make people happy, so I like to use a lot of color. In classes, they always say," You need to find your voice" and  to that my response is "I believe I am multilingual!"


Q: You live in the beautiful state of Hawaii. How is the quilting scene there?
A: There are a lot of different kinds of quilts here. While there are traditional quilts, we live in a place that never goes below 60 degrees at night, so there isn't a great need to create warm quilts. About 50% of the population is Asian, so there is a strong Far East influence in a lot of the work.Then we have  Hawaiian influences and a lot of art quilting. There are more artists ( of all mediums) per capita in Hawaii than in any other state, so we have a vibrant art scene here and quilting is accepted as part of that scene.

Q: Do you have a favorite WonderFil thread?
A: That depends on the project.  I really like my threads to show, so I gravitate towards the heavier threads. That being said, I won't use anything but DecoBob in my bobbin...my longarm just refuses to work without it! I use a lot of variegated threads, like Mirage, because I love the color changes, and your cotton ( Konfetti) is great for piecing. You have such a large offering; I am looking forward to trying all of them!

Q: What is coming up for you in 2018?
A: I teach locally a lot and we have 3 local shows this year ( Quilting on the Beach). I have applied to teach at the AQS shows, and I have been invited to teach at the Israeli  Quilting Conference in July, as well as in Mongolia and Australia. I am working hard to have some new pieces completed for the upcoming SAQA exhibits. So I am pretty busy. That being said, I love to teach, so let people know to contact me if they would like me to come to their guild or show.


Visit Phyllis' Website

"Out of the Darkness"Thread Sketching done with WonderFil's Mirage™ and Spagetti 

"Out of the Darkness"
Thread Sketching done with WonderFil's Mirage™ and Spagetti


25f04a57-d048-4147-9be6-f06d689e4d23.jpg

Our Teacher of the Month: Vikki Pignatelli

WonderFil Specialty Threads

"Wildflower Meadow" using WonderFil InvisaFil

"Wildflower Meadow" using WonderFil InvisaFil

Vikki has been part of our Teacher Program since 2008.

Vikki has been part of our Teacher Program since 2008.

Vikki Pignatelli

Vikki is a full-time professional national/international teacher, lecturer, quilt-artist, designer and author. Vikki and her quilts have been featured in many books, national publications and exhibitions. She has won 32 awards in national and international competitions and exhibitions. A self-taught artist with experience in painting (watercolor and oils) and sculpture, Vikki is known for her flowing designs and passion for color--as well as breaking all quilting "rules." She is the author of three books  "Quilting Curves” , “Quilting By Improvisation” and "Nurture Your Creative Spirit: Wisdom and Insight Learned From the Art of Quilting", and has produced a DVD, “Crazy About Curves".  Vikki has written many “how-to” articles published in Quilter’s Newsletter, AQS and Quilting Arts magazines. Vikki is also the founder (1999) of the national biennial Sacred Threads Quilt Exhibitions, a two-week display of original artwork that explores themes of spirituality, joy, inspiration, healing and grief. Deeply influenced by her husband’s bout with cancer and his recovery in 1993, most of Vikki’s artwork now focuses on the themes of healing, spirituality, hope, and inspiration.  Vikki lives in Reynoldsburg, Ohio.


Q: How long have you been quilting? How did you start?
A: I started in 1991. I actually hated sewing when I was growing up. My sister decided to take a beginner's quilting class and hounded me to take it with her. I resisted for a long time then finally caved. I loved it right away. My sister lives next door to me and still quilts, but she went the traditional route, while I went more towards art quilts. I started doing what I now call
" Healing Quilts" when my husband was ill. I made a quilt I called 'Breaking Point',  with a tree clinging to a cliff, because that is what I felt like at the time.

Q: You do a lot of appliqué work. Do you prefer hand or machine appliqué?
A: I actually do a combination of both. I wanted to do a lot of curves in my quilts, but I found the traditional methods for piecing curves didn't work for me. I developed a method of stitching one piece down without turning it under, then stitching the adjoining piece over top with the allowance turned under. Once I found a good stabilizer, it worked very well for me. I submitted my quilt to 'Quilter's Newsletter' and it was published in 1996. When they asked me to describe my method, I ended up writing a 4 page article about my technique. My whole career has stemmed from that article, as I started to get requests to teach. I love travelling and I love creating, so I feel so lucky to do both.

Q: Do you do your own quilting, once the quilt is constructed?
A:  Yes, I do it all myself. I have purchased a mid arm machine for some of my work, but I find I still do a lot of the quilting on my old domestic machine. When I start the quilting, I often have no real plan before I start...I just start to sew!

Q: You seem inspired by nature. How do you find your inspiration?
A:  I use nature as the metaphor for emotions. For example, in my quilt 'Life Beyond', I depict a tree in the winter, with its roots in a frozen pond. Winter is really the season after the growing cycle, a sort of 'death' of nature. I remember walking in the park one winter and noticing that I could still see the gold fish swimming under the frozen surface of the water. And that was the metaphor...that even if we couldn`t see it, there was life in that seemingly dead park.

Q: What is your favorite WonderFil Thread?
A:  My clear favorite is your 100 wt thread, InvisaFil ( Vikki designed WonderFil's InvisaFil color sets in 2008). I also love to quilt with your slitted polyester, Hologram. I like to use two strands through one needle to make the quilting work 'pop'. Some of my quilts have open spaces that I fill with 'webs' of thread, that I create using a wash away stabilizer and Hologram and InvisaFil.


Visit Vikki's Website

"Sacred Waters" using WonderFil InvisaFil (Detail below)

"Sacred Waters" using WonderFil InvisaFil (Detail below)

Our Teacher of the Month: Catherine Redford

WonderFil Specialty Threads

English Paper Piecing with InvisaFil

English Paper Piecing with InvisaFil

English Paper Piecing with InvisaFil

Catherine joined the WonderFil Teacher Program in 2015.

Catherine joined the WonderFil Teacher Program in 2015.

Catherine grew up in the Northwest of England and learned to knit and sew at an early age. While she was in university studying for a degree in Food Science, she took up knitting and cross stitching. She also met her husband there, and together they raised four children. In 1995, they moved to Naperville,Illinois, just after she had published her first cross stitching pattern.She took her first quilting class at Stitches and Stuffing in Naperville in 1998.Five  years later she started teaching quilting at Pieceful Heart Fabrics and taught there for 10 years until they closed their doors in 2013. In 2013,  she was invited to appear on Quilting Arts TV and has since taped several segments on various topics. She is  a regular contributor to Modern Patchwork magazine and is the author of two Modern Machine Quilting QATV workshop DVDs.


Q: Tell me a bit about how you started quilting.
A:  I have sewn since I was a little girl. I used to teach cross stitching when I still lived in England. When I moved to the United States, many of my new friends were quilters. My daughter had to make a qulit as a project, so we took a trip to a quilt store together, and it all started from that.

Q: You do many different quilting styles: free motion, Modern Quilting with the feed dogs up, hand appliqué and embellishing. Do you have a favorite technique?
A: I still really enjoy hand stitching. I like to sit and take the time with my work. But I also really like to finish my own quilts. I am a Bernina embassador, so I do all my quilting on a Bernina domestic machine. When I taught at the quilt shop, the owner would see something new and ask me to teach a class, so I took a lot of classes myself and was able to learn a lot of new techniques.

Q: You are new to the WonderFil Teacher Program. How did you hear about us?
A:  I had heard from other quilters about WonderFil and I was intrigued by the many different threads. I had purchased some Tutti and Konfetti ( 50 wt cotton) at a show and decided to use it for a quilt I was making for QuiltCon. The thread stitched beautifully. I also went to one of Andrew's presentations and he emphasized how well the 80 wt ( DecoBob) and the 100 wt  
( InvisaFil) worked for piecing. I was doing English Paper Piecing at the time. I decided to give it a try although I was sure that it would be too fine. I was wrong; it was really easy to use and did not slip or break.

Q: What are your favorite WonderFil threads?                             
A:  As I said, I love the InvisaFil for my appliqué work and for English Paper Piecing. For the hand work, I love Eleganza. I am so impressed with the quality. The thread runs so smoothly through the cloth, and I love the many bright, solid colors.

Q: What is your favorite part about teaching?
A: I am a very curious person and I love to learn. But when I learn something, I want to tell people about it. I've always enjoyed passing along what I've learned. I love to be able to explain things to people in a way that they will understand. I want my students to be inspired to go home and create.

Q: What is coming up for you in 2016?
A: I will be travelling to new places this year ( Calgary- my first trip to Canada, Tennessee, South Carolina). I will also be teaching at IQF in Houston. Apart from raising my children, this is the hardest I've ever worked. I love it!


Visit Catherine's Website

"After April Showers" Made using WonderFil's 'InvisaFil'Pattern published in Modern Patchworks Magazine, Spring 2015 

"After April Showers" Made using WonderFil's 'InvisaFil'

Pattern published in Modern Patchworks Magazine, Spring 2015


"After April Showers" Closed up

"After April Showers" Closed up